Sunday, August 6, 2017

Replacing Chain on Jill

< Replacing Chain Sounds Easy But Not As Easy As It Sounds >

When I changed the tires on Jill I didn't give the current chain much thought, I just let it hang loose off the sprocket collecting water and sand and dust - because I would change it once the new tire fits into its place.

Oh well, this is a typical How-Not-To-DIY episode.

I didn't have a chain cutter nor a grinder so I thought I could just remove the chain from both sprockets and put in the new chain.

So I set out to open the crankcase cover.


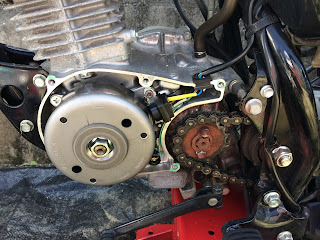
And here it was exposed. See the green stubs here and there?


I used brake cleaner to soak them and then scrap it off with a plastic kitchen-scrapper.

This was the result of the scrapping.

In goes a new non-genuine-part gasket. It felt a bit thinner than the green one.

Here is how it looks on the engine block.

The gasket went in without drama and all was good. But the catch is this: I wasn't able to replace the chain. Why? because even by removing the chain from the sprockets, it wouldn't come off the bike for there is no clearance between the frame and chain.

Oh..... stupid me. Should have checked first before I set out to do all the work.
So there was the lesson #1. Know what you are doing before actually set out to do it.

I still have another lesson learned. Lesson #2, wear protection!!!

Cheers,
CK

Saturday, July 29, 2017

DIY wheel balancing

Rather than a blog entry it is more like a note to myself.

And so I have managed to raise the bead on the rear tire of Jill (finally!).
(my last blog entry tells the tale of how defeated I was after the first try on the rear tire)

With that out of the way, I went on to perform the wheel balancing.
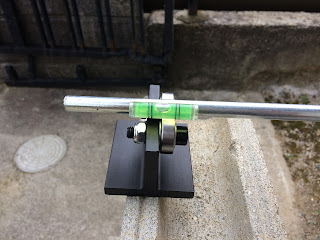
It is a DIY setup and I wouldn't even try to hide the fact that this balancing might only be good just for self satisfaction rather than bringing any actual benefit.

And this was my setup.


I recorded a 40 seconds clip on the actual procedure of balancing itself.
I later learned that this is what people describe as "static balancing", meaning the balance achieved in this setting is not good enough for actual riding.
I am quite OK with it anyhow because I don't have the equipment for dynamic balancing anyway.
Beggars can't be choosers I guess. :-)

This is the link to the video on youtube.
DIY Wheel Balancing on Honda Ape100

There are some lessons learned out of this tire change.
First, know the parts before taking apart the wheel assembly. I thought I knew, but it turned out that I lost the rear wheel collar. I am positive that I lost it (not something to brag about obviously) because the whole rear drum brake assembly just thumped out onto the ground when I removed the wheel from the axle. I didn't pay attention to what came out, and the price to pay is the losing of the part.

Second, do all relevant maintenance at one time.
I thought I wouldn't put in a fresh chain in this time but I was wrong. Turned out that the chain was so stiff and rusted I would want to change it.

Lastly, always budget more time and money than anticipated.
Yes, tools are always not enough, for a sunday mechanic like me.

Cheers,
CK

Sunday, July 23, 2017

Thoughts On Type Of Tires For Long Way Round

< Tube or Tubeless? >

I thought I have made up my mind about the choice of tires for the trip, but little did I know that I knew nothing about tires.

The tire changing on Jill (both front and rear) has given me some real experience and knowledge (however little that could be) in changing tires. I have always thought it would be a straightforward, like how one would go to the gas station, opens the fuel tank cap, pumps and pays then off you go. But no, things surely didn't work that way.

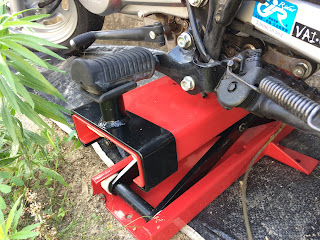
This was taken when changing the rear tire on Jill. I bought a bike jack which I didn't when doing the front tire. Lesson #1: a bike with center stand is certainly a bonus on the LWR trip. 


 Then I went on and dismantle all that I had to. Nothing special here for I have been expecting the work after consulting the service manual. One thing caught me by surprise was how I had to use a steel rod to poke the rear axle out. Didn't think it would come to that. All in all everything was fine.

Dropping the bead was easy this time as I know where to put the levers on this time. As shown in the photo.

 Managed to swap the tire on as well, without too much of a drama. Really experience is the only thing that counts, as I remember one of my bike buddies said.

 But here's the thing. The photo on the left shows the side of a perfectly raised bead. On the right side, you can see that the bead was not equally raised along the sphere.
From another angle, I suppose everyone can tell that this tire might get the rider killed.

OK so much for the background information. This is a tubeless tire. To raise the bead I needed to get to the gas station and use the big capacity air compressor. For obvious reasons I couldn't get keep using their compressor so I had to go and get help, then come back and found out that it wasn't OK, then do some adjustments and go back again...

All this is very tiring and not very confidence inspiring.

And this is the issue - how do I change a tire if need be on the LWR trip without something that would create so much air pressure? I suppose there isn't any in the midst of Siberia.

There are people who says bead could be raised even with a hand pump. And I know by theory it should and could work. I tried that at home after two trips to the gas station. Maybe I need more practice, maybe my method was wrong, but it sure didn't work as I hoped it would be. (the pump did work though)

With a tube tire, I know for a fact that no air compressor is needed. (I haven't done any tire swapping but I have seen it in person in the past.) However, a tube tire tends to loose its pressure way faster than a tubeless tire in case of puncture, which could be very harmful for the rider.

I don't know. I think I still have plenty of time to think about this before I have to make a judgment call.

Cheers,
CK
Thursday, July 6, 2017

Did the dealer bled my brake fluid properly?

< Air Bubble In Brake Reservoir? >

So the story goes like this:

I entrusted my beloved Lara to the dealer for the mandatory 12-month inspection. The bike went in good condition and the only changes done was the brake fluid change. The bike came out with a mushy front bike and I took this video and asked for opinion on Facebook.

Possible Air Bubble In Brake Reservoir?

I got opinions on both sides of the fence. However, the majority seems to think that the brake system wasn't bled in a proper way.

I have no way of telling if this is OK to accept, although I am riding the bike and I sure could brake faultlessly. However, just to be on the safe side, yes I will heed the opinion and go to the dealer to have them re-bled the whole thing.

Cheers,
CK

Sunday, July 2, 2017

Suzuki Bikes Test Ride Day

I remember my first time attending in a test ride event was with Honda. That was like some 10 years ago. Luck has it that Suzuki is coming somewhere nearby so I decided to went for a ride and while at it do some test rides as well. 

Event was scheduled to begin at 930am but I arrived early to avoid long lines. The staff was still prepping the course. Suzuki charted the whole parking lot and made something that resembles a gymkhana course for the test ride.

Another angle at the reception booth. Notice the supply truck from Suzuki.

These were the booths for people to sit at while waiting for their turn at the bikes. They were organized by model. One model per line.

These were the bikes available for testing today.  Apparently they didnt have the whole lineup for testing but there were enough bikes to grab my attention. My goal was to test ride the sub 250cc bikes. Not much interest for the larger bikes. (I already have one)

The much hyped V-Strom 250. Funny that they call it V-Strom because it isn't a V-Twin in her but a parallel twin. Anyway I can appreciate the marketing effort there. Given a chance I might even think of owning her.

This was a little stage prepared on the bed of a truck. The timetable says there would be talk show in between the test ride sessions but I didn't wait long enough to see that.

So this is how it looked like. People waiting under the tarp and the lines of bikes right in front of my eyes. Really, I was hypnotized by the combined wonder of all those bikes. I think for once I really fell for Suzuki.

My choice of bikes. Gixxer 150 and the Burgman 200.

So this is how it works. Gotta go register at the receptionist by filling out a waiver form and showing the driver's license. Then each is issued with 3 coupons - one coupon per test ride. Use up all three and your time is up. (although the staff did approach me and asked me if I would like to get another three coupons upon finishing my turns.)

Bike pix. Damn just look at that Hayabusa. It has a 1.3 liter inline 4 under the seat. That's like a car!

And all the gixxers. The one on the right is the big gixxer and next to it is the small gixxer. I test rode the small gixxer as well.

Another angle. Really, I think the small gixxer works wonder. It's not fast by all standards but it is enough to move my soul.

Yes you got me I was trying to photo the lady in pink. Nothing weird about her but she seemed to be the only woman who displayed such intense interest in bike.


This is the Gixxer 150. I really liked it. Won't turn heads but good enough for me.

A far view of the course.

There were many people attending the test ride. All in all I would say I wouldn't just go for a test ride but would mix it with a ride day. Just too much hassle to go so far for a total of 9 minutes saddle time. 

In my opinion this is how the foreign manufacturers beat the Japanese brands in their domestic market in the large bike segment. For harley and BMW, there isn't any regular test day like this one. But they let you test their bike anytime anyway and practically without limit. You can just go and blast for half an hour, go onto the highway if you like. Japanese manufacturers need to get better....

Cheers,
CK

Friday, June 16, 2017

Between Planning and Execution

< So many plans but only so few pan out >

Took a photo of my riding plans drawn up in the last January as a new year solution for motorbiking.

It's not the time for a half-year review just yet but I figure at the rate things are going, I might as well call today the final day of June already.

I drew up plans for the first 8 months. Taking stock for plans planned for the first half of the year, I realized that I only managed to hit one target out of so many.

It's a terrible result. yes. sigh.


I wanted to ride to downtown for the new year illumination but I didn't.
I wanted to visit various water dams in February but I didn't.
I wanted to camp in March but I didn't.
I wanted to camp again in April as well as revisiting a beach I liked very much but I didn't.

However, I wanted to tour the Shikoku island on Jill and that, I did.

That's my one hit out of all targets.

This is frustrating. Really. Traveling own the memory lane to check why I failed to materialize these goals, I realized that I have had issues at work and family during this first half year. And I felt tired on my down time and that's why I didn't just go and ride.

Looking at this sheet it really makes me fuming at myself. However, the idea of making this list was a correct and a good one. It helped me to see what I wanted to do, helped me keeping track of my own progress and helped me to focus on my goals.

In the past six months I did ride, and I have to say that those rides were downright fun as well. I just didn't ride as much as I would like to and I didn't ride to the places I listed down.

So now is a good time to reflect upon those choices. Should I keep to the list, or should I just go with the flow?

I think the best would be striking a balance between the two. How? That's the million dollar question.

Cheers,
CK


Monday, June 12, 2017

Thinking About Motorcycling Wear Again - Jacket

I make no attempt to hide my enthusiast for riding jacket and pants. Maybe it is because I have no interest in day to day fashion and this riding gear has become my obsession. Or maybe it is because I think I ought to take care of myself when I am on the bike so I pay lots of attention to riding gear. Whatever it is, I am always talking about wear and looking at wear.

I haven't bought any riding jacket since year 2005 actually. I still wear that good old harley leather jacket. It is tough and cuts off the wind very well but it does not come with any protection at all. If it had the pads on.... that's what I always have on my mind. But we know thinking about it won't make any changes, if i want something with pads I will have to make it happen.

So I went ahead and bought separate elbow pads and back pad. They are good when worn in combination with the leather jacket. The downside is that they aren't convenient. Putting them on and off is an effort in itself although it doesn't take that much time at all. 

Wait a minute, I have bought myself a full racing suit as well. OK so my harley leather was the only riding jacket I bought, but I also have a full suit. :-)

Since getting myself the BMW I have ridden more miles than when I had my harley. I ride more often and for longer hours in a single ride and for much farther. As a result, I have faced a bigger variety of elements compared to the days when I was on the Harley.

It prompted me to rethink about gear. I need something that will give rain, abrasion, weather and crash protection. All functions in one piece of gear. That's why I want another piece of jacket but not the harley leather anymore.

I am looking at the so called Adventure Jacket. Naturally I am looking at the BMW line up because they are famous for it. I must say the price is very steep. A similar set up offered by Komine is almost half the price. But then I don't know how well the Komine stack up to long term abuse on the road.

The retail price for a BMW Dry Suit Jacket is about 650usd now. I know, not unrealistically expensive but nevertheless that's a lot of money. Perhaps if i saved up 100USD a month by year end I could get myself that long yearn jacket. :-)


Sunday, June 11, 2017

Photo Shooting And Riding

< Is Riding Compatible with Photographing? >

As a rider who is inspired to be riding an overland adventure in the not so distant future, I myself think the question is sort of nonsense. I believe the idea of taking photographs on a trip like that is a given, is un-negotiable and non-questionable. Yet I am asking this question, but in the sense of can or can not, but more in the sense of how to do it the better way.


 We all know cameras are expensive be it action camera or traditional camera. There are always issues with handling and storing of the gadget and most of the time there is this theft issue as well. When we look up everything nice then it would be real hard to take it out for a shot. But let's say we put the camera in the tank bag to allow quick access, then in case of an unwanted mishap the camera could just go south. Perhaps, we are just talking about chances. Or maybe chances are the only thing that we can actively consider.

 And I wonder how to store that large amount of data when on an overland ride. Is it even possible? I was thinking maybe cloud storage. But then not all destinations have connection stable enough for cloud storage. If not then what? Multiple external hard drives? And while at it might as well keep the hard drives at different locations on the bike to prevent all from going kaput in case something happens?

 The list just goes on and on for me. Perhaps, I should stop thinking about it and go out there and do it and find the answers myself. :-)

Cheers,
CK