Friday, June 16, 2017

Between Planning and Execution

< So many plans but only so few pan out >

Took a photo of my riding plans drawn up in the last January as a new year solution for motorbiking.

It's not the time for a half-year review just yet but I figure at the rate things are going, I might as well call today the final day of June already.

I drew up plans for the first 8 months. Taking stock for plans planned for the first half of the year, I realized that I only managed to hit one target out of so many.

It's a terrible result. yes. sigh.


I wanted to ride to downtown for the new year illumination but I didn't.
I wanted to visit various water dams in February but I didn't.
I wanted to camp in March but I didn't.
I wanted to camp again in April as well as revisiting a beach I liked very much but I didn't.

However, I wanted to tour the Shikoku island on Jill and that, I did.

That's my one hit out of all targets.

This is frustrating. Really. Traveling own the memory lane to check why I failed to materialize these goals, I realized that I have had issues at work and family during this first half year. And I felt tired on my down time and that's why I didn't just go and ride.

Looking at this sheet it really makes me fuming at myself. However, the idea of making this list was a correct and a good one. It helped me to see what I wanted to do, helped me keeping track of my own progress and helped me to focus on my goals.

In the past six months I did ride, and I have to say that those rides were downright fun as well. I just didn't ride as much as I would like to and I didn't ride to the places I listed down.

So now is a good time to reflect upon those choices. Should I keep to the list, or should I just go with the flow?

I think the best would be striking a balance between the two. How? That's the million dollar question.

Cheers,
CK


Monday, June 12, 2017

Thinking About Motorcycling Wear Again - Jacket

I make no attempt to hide my enthusiast for riding jacket and pants. Maybe it is because I have no interest in day to day fashion and this riding gear has become my obsession. Or maybe it is because I think I ought to take care of myself when I am on the bike so I pay lots of attention to riding gear. Whatever it is, I am always talking about wear and looking at wear.

I haven't bought any riding jacket since year 2005 actually. I still wear that good old harley leather jacket. It is tough and cuts off the wind very well but it does not come with any protection at all. If it had the pads on.... that's what I always have on my mind. But we know thinking about it won't make any changes, if i want something with pads I will have to make it happen.

So I went ahead and bought separate elbow pads and back pad. They are good when worn in combination with the leather jacket. The downside is that they aren't convenient. Putting them on and off is an effort in itself although it doesn't take that much time at all. 

Wait a minute, I have bought myself a full racing suit as well. OK so my harley leather was the only riding jacket I bought, but I also have a full suit. :-)

Since getting myself the BMW I have ridden more miles than when I had my harley. I ride more often and for longer hours in a single ride and for much farther. As a result, I have faced a bigger variety of elements compared to the days when I was on the Harley.

It prompted me to rethink about gear. I need something that will give rain, abrasion, weather and crash protection. All functions in one piece of gear. That's why I want another piece of jacket but not the harley leather anymore.

I am looking at the so called Adventure Jacket. Naturally I am looking at the BMW line up because they are famous for it. I must say the price is very steep. A similar set up offered by Komine is almost half the price. But then I don't know how well the Komine stack up to long term abuse on the road.

The retail price for a BMW Dry Suit Jacket is about 650usd now. I know, not unrealistically expensive but nevertheless that's a lot of money. Perhaps if i saved up 100USD a month by year end I could get myself that long yearn jacket. :-)


Sunday, June 11, 2017

Photo Shooting And Riding

< Is Riding Compatible with Photographing? >

As a rider who is inspired to be riding an overland adventure in the not so distant future, I myself think the question is sort of nonsense. I believe the idea of taking photographs on a trip like that is a given, is un-negotiable and non-questionable. Yet I am asking this question, but in the sense of can or can not, but more in the sense of how to do it the better way.


 We all know cameras are expensive be it action camera or traditional camera. There are always issues with handling and storing of the gadget and most of the time there is this theft issue as well. When we look up everything nice then it would be real hard to take it out for a shot. But let's say we put the camera in the tank bag to allow quick access, then in case of an unwanted mishap the camera could just go south. Perhaps, we are just talking about chances. Or maybe chances are the only thing that we can actively consider.

 And I wonder how to store that large amount of data when on an overland ride. Is it even possible? I was thinking maybe cloud storage. But then not all destinations have connection stable enough for cloud storage. If not then what? Multiple external hard drives? And while at it might as well keep the hard drives at different locations on the bike to prevent all from going kaput in case something happens?

 The list just goes on and on for me. Perhaps, I should stop thinking about it and go out there and do it and find the answers myself. :-)

Cheers,
CK

Wednesday, June 7, 2017

Changing Tire

Being able to change tires on my own is very vital to my long term survival on the road, I think. So I set out to try and change the tires on Jill. ( could not bring myself to do it on Lara, could hurt her. )

I started with acquiring the necessary tools. Tire levers, rim cream and air pump. Yes it is a manual pump. Read it on the internet that the electric air pump won't do good in raising the bead so I got myself this one.


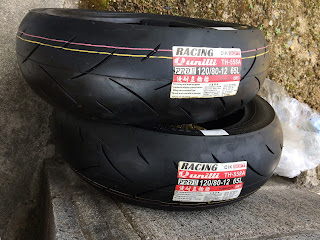
 Tires are 50USD a piece made in Taiwan. Looks like racing spec tires but I really don't care. Any tires is better than the stock block tires.

It looks easy on the blog but in actual it was very hard. Very very hard indeed for a newbie like me. I wrestled the tire for a good 90 minutes before I knew just how exactly to work the tire levers to get the tire out. So yes I finally got the tire out.

And I ended up laying Jill on her front end without tire. sigh.... why?
because I couldn't put on a fresh tire back in. I just couldn't figure out why the tire wouldn't get back in. This is a very valuable lesson learned.

On top of that, I have photos to show that I was not thoughtful enough in preparation. Notice that I do not have any front end stand or car jack to stand the bike up. I just used a block on the right peg. I though it was OK as shown in the second photo but no, the bike eventually just toppled. I hope I didnt fxxxed up the front forks....

So all in all, Jill is still in critical condition. I am looking for help now.

Pray for me that Jill will get well soon. :-)

Cheers,
CK

Sunday, June 4, 2017

Replacing the stock windshield with GIVI AIRFLOW

< STOCK WINDSHIELD VS GIVI AIRFLOW >

I have been looking for an alternative to the stock windshield on Lara for a long time. Too many choices out there and I haven't encountered any after market windshield that hasn't got verdicts from both sides. Windshield is not cheap and I couldn't make up my mind until now - spotted this GIVI AIRFLOW on eBay at a price of 120USD (including shipping from Italy to Japan) and I just had to do this. I figured the price was right and I gotta try now or later anyway. (by the way this screen is retailed at 400USD in Japan, can you believe it??)

So, this is the stock windshield. Cute huh.

The GIVI AIRFLOW comes in a two-piece configuration. This is lower shield which is the exact replacement of the stock thing.

 This is the second piece in the setup. It goes on top of the lower piece. The piece is fitted onto the lower piece through the two grooves in the center. Yes it is height adjustable.

This is the steel support that goes right into the bike side cowl fitment position.

This is how the GIVI AIRFLOW looks in action.

OK, a step by step installation that I did. Hope this could help someone, somewhere, sometime.
This is the stock windshield. I needed to take this off. It's easy, just four torx screws to remove.

Then this is what you see. Keep the original torx screws, you will need it later. And don't remove the rubber washers. Let them stay there.

Next, prepare for steel support installation. This is the left side cowl of the bike. See the shiny little torx screw at the bottom of the photo? Let's remove that. You can put this away as you don't need it anymore.

This is the installation paper from GIVI. Just do as told and we are good.

For good measures I took a photo on the right side cowl as well. This is after the removal of torx screw. Do you see the small embedded square? this is where #2 in the above photo needs to go into.


ok, so we install the stem of the steel support into the side cowl, and the top end is connected to the lower piece of the GIVI AIRFLOW like this. In case you have a question, no, the upper piece of the GIVI AIRFLOW does not get any support other than the two locking devices which you can see in the photo below.

A look at the set up from the rider position.
 I thought everything could be done with torx but I was wrong. Apparently GIVI isn't BMW, so GIVI wants us to use hex screws.
 And GIVI also wants us to take out our ratchet to tighten up the top end of the steel support. OK, will do. no complain there.
Finally, install the upper piece into the lower piece. Match the groove to the guideline and it should go down pretty easy. It could be a little tight because it is the first time getting used. But don't lubricate it for easy assess.

 Taadaaa, this is how my cockpit looks now.

 A comparison between the stock and GIVI.

I went for a spin with this new setup. The result was.... fantastic. Yes it isn't without its drawback but I got what i wanted. There was no headwind resistance anymore when the screen was at its highest position. I could open my helmet visor at 100km/h, no problem at all. And the width does a good job at channeling the wind away from my upper body. The wind blew over my helmet, my shoulders and elbows and obviously left the torso untouched. It was a very easy ride with GIVI AIRFLOW.

I did not encounter any turbulence hitting my helmet or any noise issue as well. I suspect this is due to my height and build - I am only 160cm tall and I am very small. I guess the GIVI AIRFLOW protection coverage was big enough to cover all of me.

However, there were issues as well. Above 110km/h, the headwind coming from under the windshield grew stronger and it became a stream of air that blew upward, hitting my helmet from down under. As a result I was experiencing constant small vibration in the helmet and it felt like the wind was going to lift up my helmet (although it did to actually do that). When the speed is below 100km/h everything was in order. Another issue was that I could feel wind pushing me from the back. I guess this is because of the relatively vacuum pocket that the GIVI AIRFLOW created. Still, not a deal breaker.

All in all, it is a keeper. Big smile. :-)

Cheers,
CK